Generators
Generators take the burden out of common tasks like creating projects, controllers, services, etc. In order to get started, you must install the tool using the command:
dotnet tool install --global UpDevs.Sdk.Generators --version 1.0.10
Solutions & Projects
In order to create solutions and projects, you should use the command:
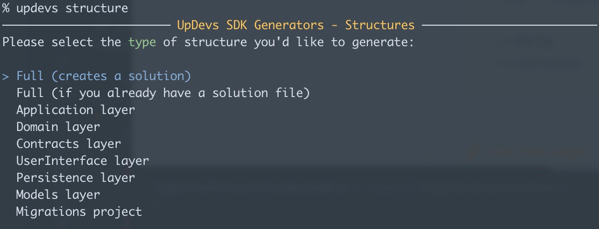
updevs structure
The options available are:
  -t, --type               Type of structure to generate. Acceptable values are:
                           full-with-sln, full, app, domain, contracts, ui,
                           persistence, models, migrations.
  -n, --newSolutionName    Name of the solution to be created.
  -x, --projectPrefix      Prefix of the project(s) to be created.
  -d, --databaseType       Type of database. Acceptable values are: sqlserver,
                           mysql, sqlite, postgres.
  -m, --mappingTool        Mapping tool. Acceptable values are: mapster,
                           automapper.
Although you can use the command with all the options, you can also just run updevs structure and provide the required information:
| Option | Description |
|---|---|
| Full (creates a solution) | Creates a new solution with all the projects following the UpDevs SDK standards (API, Domain, Application, etc.). |
| Full (if you already have a solution file) | Creates the full structure of projects following the UpDevs SDK standards, adding them to the existing solution file. |
| Application layer | Creates the .Application project. |
| Domain layer | Creates the .Domain project. |
| Contracts layer | Creates the .Contracts project. |
| UserInterface layer | Creates the .UserInterface.API project. |
| Persistence layer | Creates the .Persistence project. |
| Models layer | Creates the .Models project. |
| Migrations project | Creates the .Migrations project. |
For all the projects created, the generator will also add all the required files and libraries. After running the command and providing instructions:

We'll have the following solution/projects structure:
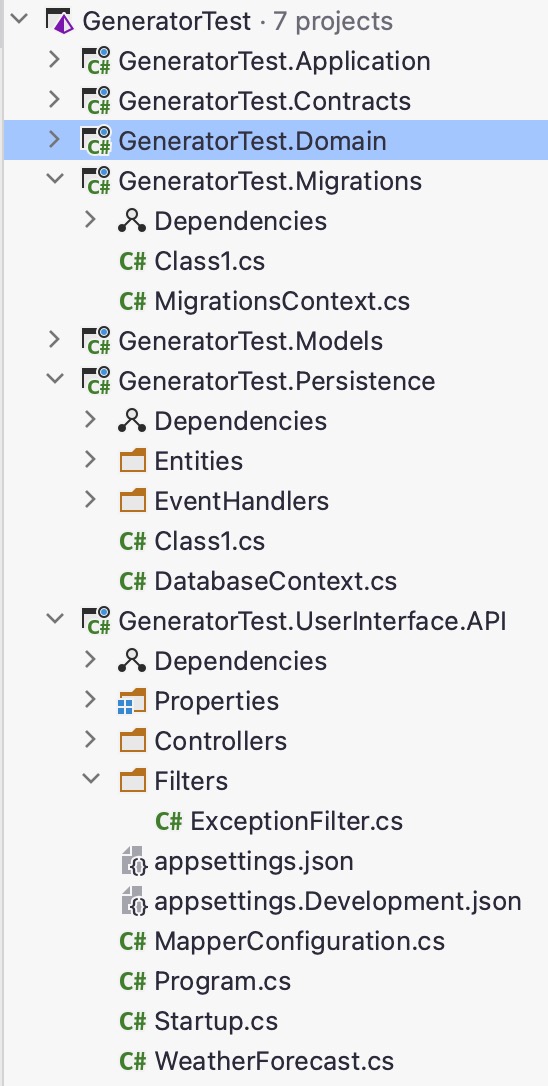
This structure is prepared with everything required to start developing.
You can remove all Class1.cs files that were automatically generated.
Files
In order to create files following the UpDevs SDK standards, you should run the command:
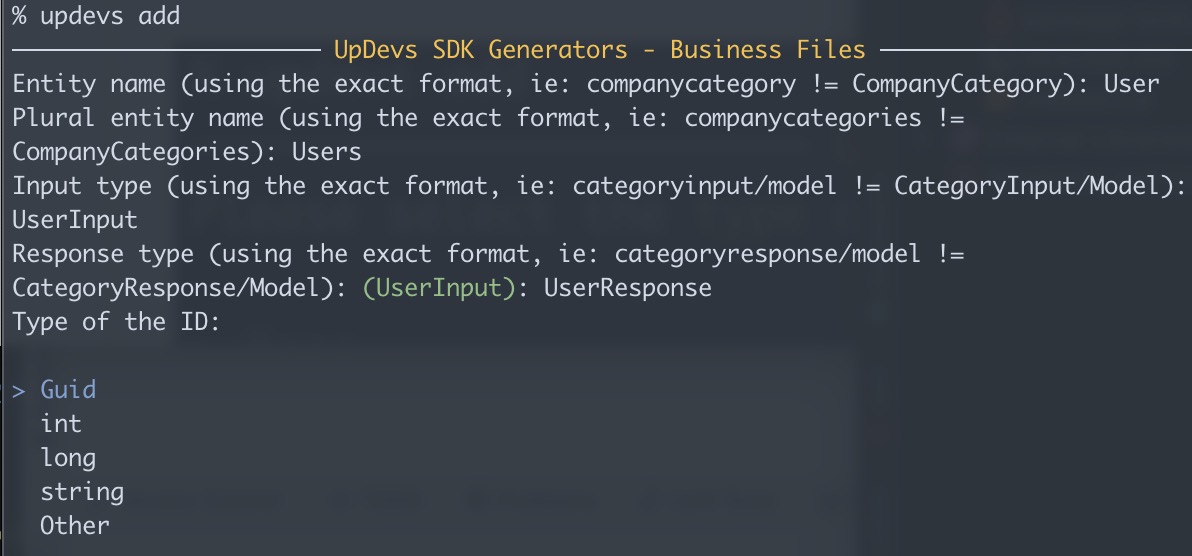
updevs add
The options available are:
  -s, --scaffold                Type of scaffold to generate. Acceptable values
                                are: application, domain, controller and full.
  -t, --type                    Type of structure to generate. Acceptable values
                                are: base, list, search and entity.
  -d, --idType                  Type of the ID. It can be any C# valid type for
                                IDs.
  -e, --entity                  Entity name (using the exact format, ie:
                                companycategory != CompanyCategory).
  -p, --entityPlural            Plural entity name (using the exact format, ie:
                                companycategories != CompanyCategories).
  -i, --inputModel              Input type (using the exact format, ie:
                                categoryinput/model != CategoryInput/Model).
  -r, --responseModel           Response type (using the exact format, ie:
                                categoryresponse/model !=
                                CategoryResponse/Model).
  -z, --applicationProject      Name of the project representing the application
                                layer.
  -y, --contractsProject        Name of the project representing the contracts
                                layer.
  -x, --domainProject           Name of the project representing the domain
                                layer.
  -w, --userInterfaceProject    Name of the project representing the
                                UserInterface layer.
  -v, --modelsProject           Name of the project representing the models
                                layer.
  -u, --persistenceProject      Name of the project representing the persistence
                                layer.
  -g, --projectPrefix           Prefix of the projects to be created.
  --help                        Display this help screen.
  --version                     Display version information.
Although not required, it's easier if you create your entity and model (or input/response) before adding these files. Let's use the fictitious files:
Inside the project GeneratorTest.Models we'll create two files. In the folder Inputs, the file UserInput and in the folder
Responses, the file UserResponse. They'll have the following contents:
public class UserInput : BaseEntityModel
{
    public string Username { get; set; }
    public string Password { get; set; }
}
public class UserResponse : BaseEntityModel
{
    public string Username { get; set; }
}
Now, inside the project GeneratorTest.Persistence, we'll create the entity User:
[Table("Users")]
public class User : BaseEntity
{
    public string Username { get; set; }
    public string Password { get; set; }
}
Although you can use the command with all the options, you can also just run updevs add and provide the required information:
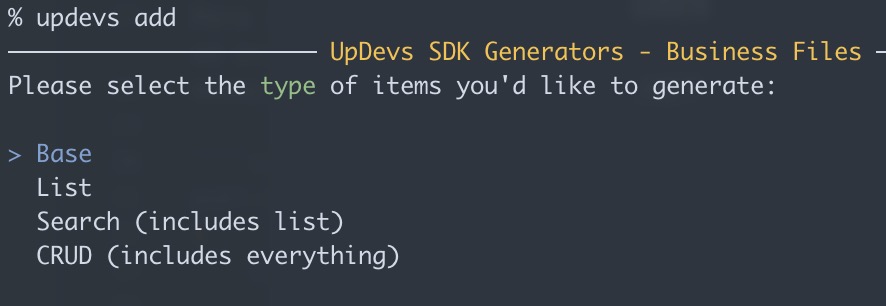
| Option | Description |
|---|---|
| Base | Creates the file(s) using the Base structure. This structure provides only the basic, extremely required functionality for the item to be considered part of the UpDevs SDK ecosystem. |
| List | Creates the file(s) using the List structure. Inherits from Base and adds listing functionality methods such as List and GetByIds. |
| Search (includes list) | Creates the file(s) using the Search structure. Inherits from List and adds the Search method. |
| CRUD (includes everything) | Creates the file(s) using the CRUD structure. Inherits from Search and adds the CRUD required methods. |
For this example, we'll select the CRUD option. After selecting that option, we must select the type of structure we need:

| Option | Description |
|---|---|
| Complete structure (domain and app services plus controller) | Creates the full set of files in their proper projects and folders, a domain service, app service, their interfaces and the controller. |
| Application service and contract | Creates the files required for the application layer in their proper projects and folders, an app service and its interface. |
| Domain service and contract | Creates the files required for the domain layer in their proper projects and folders, a domain service and its interface. |
| Controller | Creates a controller. |
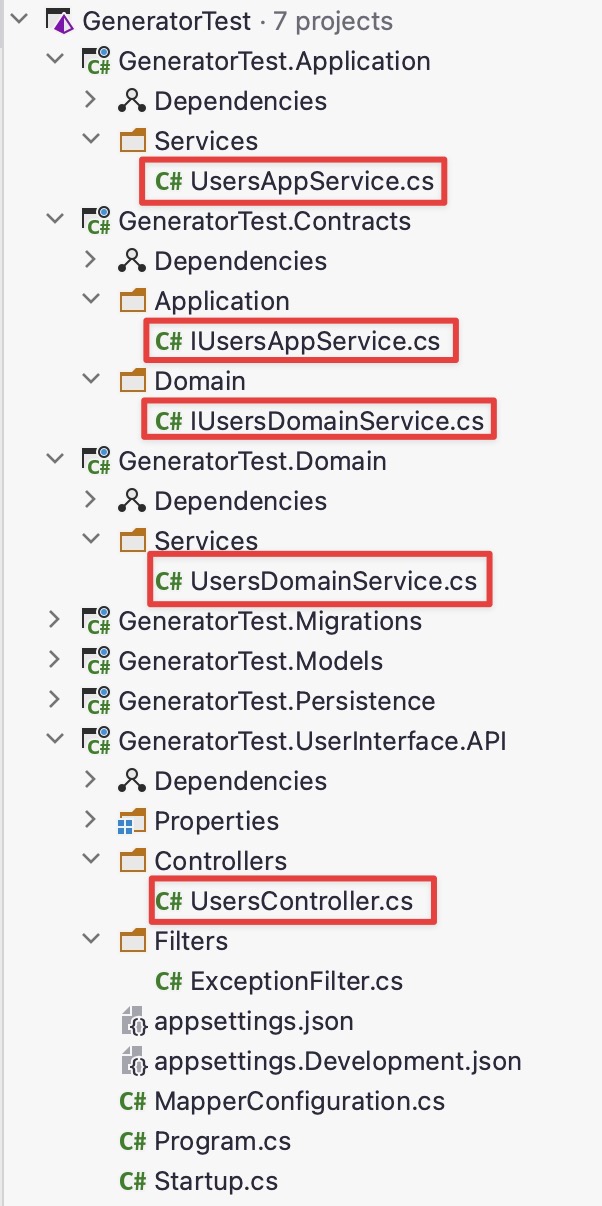
For this example, we'll select the complete structure option and provide the requested data:
The generator will then create all the files required to provide an end-to-end communication: